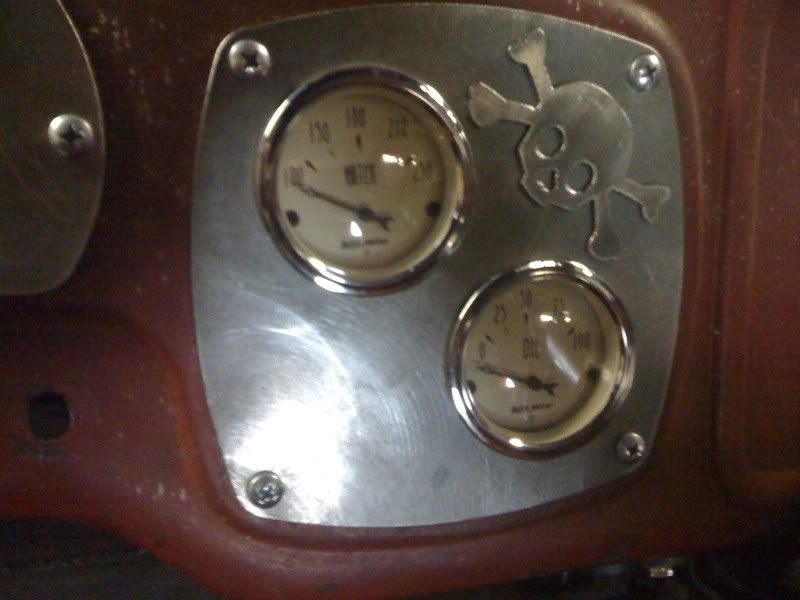
1950 dodge truck tribute to my son

Rat Rods Rule

Help Support Rat Rods Rule:

This site may earn a commission from merchant affiliate links, including eBay, Amazon, and others.
close

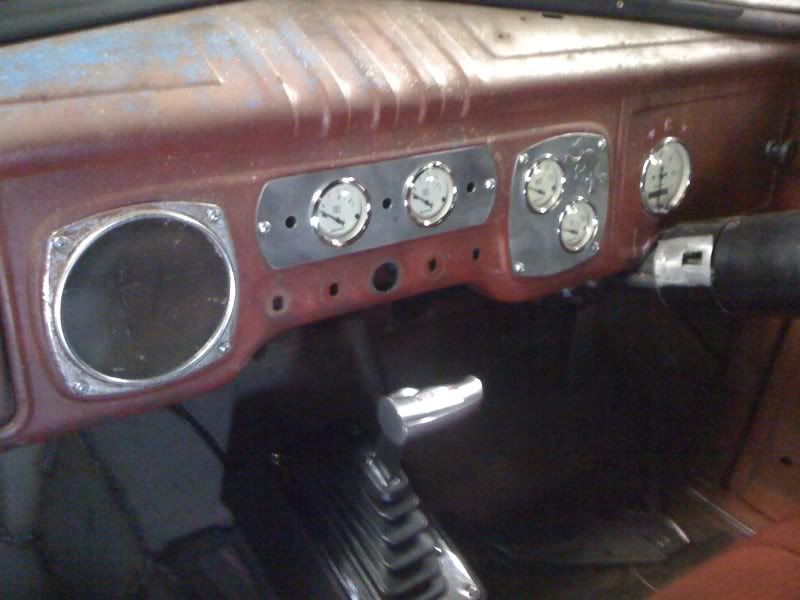
real close. finishing up the wiring this week, gas pedal and a bunch of little thing that alway seem to pop-up. 2-3 weeks is the goal.

:Later:cool:
 
little stuff

.little things that alway seem to pop-up.

one of those little things jumped up and bit me today.

l had to remove the exhaust because the pipe side of the system don't line up with the header collector. it's at a angle and leaves a 1/4'' gap, that will lead to a major exhaust leak. we cut the ends off the pipes and have to reline up the the two at the collector. that should stop any leaks. just hate to have to tear it apart when it's so close.

Later:cool:
 
Last edited:
mad0245.gif
Aaaaaaaaah MAN !

Hang in there, it won't be near as long as it has been !
 
Don't feel alone as there are always those little things. I had to tear the dash apart becasue I had put the speedo light on the wrong post of the headlight switch.....Arrggg

We forget just how many places there are in the rebuilds for things not to go right. Got to be thousands of details. Just part of the deal.

You are doing a fine job and it won't be long now...[cl

jim
 
spoon throttle pedal

got the spoon style throttle pedal in, now throw the carb on and get the TV cable and throttle cable adjusted so l can start the motor this week.

l am running an edelbrock dual plane intake and a edelbrock 600, that should be plenty of fuel for the 327.

the shifter is the goal tomarrow, taking the day off to watch the races[ddev

still have some wiring to finish up and the steering coloulm, still want it running in 2 weeks.

l have been invited to 3 car shows when "done":D so need to kick my butt inta gear and get it rollin because the shows are soon.

Later:cool:
 

Attachments

  • spoon throttle pedal 1.jpg
    spoon throttle pedal 1.jpg
    19.9 KB · Views: 19
  • spoon throttle pedal.jpg
    spoon throttle pedal.jpg
    6.1 KB · Views: 16
  • edelbrock_1406.jpg
    edelbrock_1406.jpg
    25.1 KB · Views: 14
more exhaust woes

weeeelllllllllll now, with the fenders on, the style header l was gonna run won't allow me to change plugs or run the plug wires.

lucky, me being the pack-rat l am, l have several other sets of old headers laying around, so we will modifiy a set to work. gonna have to cut the bottom area off and weave the tubes around to fit. the other header flanges on the engine side will clear everything nice.

hope the darn exhaust/header thing will go together ok this time.[S
 
header fix

fixed the header problem, now steering is in the way of my "new" headers. never fear, l have plan B, a ididt chrome tilt colulm, it was one for another project l may never get to. well l am "borrowing" the colulm for jimmy's truck.

heck, the tires and wheels, throw in the fancy colulm, l feel uptown:D

Later:cool:
 

Attachments

  • DSCI0197.jpg
    DSCI0197.jpg
    126.3 KB · Views: 39
  • DSCI0206.jpg
    DSCI0206.jpg
    116.3 KB · Views: 35
  • DSCI0211.jpg
    DSCI0211.jpg
    111.8 KB · Views: 37
  • DSCI0212.jpg
    DSCI0212.jpg
    109.5 KB · Views: 35
  • ididit column.jpg
    ididit column.jpg
    14.2 KB · Views: 30
guages and gas pedal

here is the pic of the pedal ya asked for. we built a flat spot on the firewall so it fit better.

nice guages[cl VDO gold series, the other ones with all gold was not available,
but these will do nicely.

goal is to finish exhaust this week-end and hope to stick in the new column.

the more l do, it seems the more there is to do.

progress has been slow, 3 steps foreword, 4 steps back[S


Later:cool:
 

Attachments

  • DSCI0191.jpg
    DSCI0191.jpg
    81.5 KB · Views: 59
  • DSCI0192.jpg
    DSCI0192.jpg
    137.8 KB · Views: 55
  • DSCI0193.jpg
    DSCI0193.jpg
    104.4 KB · Views: 57
  • DSCI0194.jpg
    DSCI0194.jpg
    108.6 KB · Views: 56
  • DSCI0196.jpg
    DSCI0196.jpg
    106.3 KB · Views: 57
I think that's more like 4 steps forward and 2 steps back :D It always seems slow when it's your own project but from where I'm sitting it looks like good progress [cl[cl Keep on truckin' [P[P[P
 
headers and time

got the modified headers on and the fit is great:D lots of room for the spark plugs & wires. now need to modify the exhaust pipes to fit, the "new" headers sit a little bit higher up into the frame. not a big deal, just more time.

so much for the 2 month throw her together and drive it l planned at the start of this build:eek:

but, that's just life, stuff comes up and ya adapt and go on.

''soon, l keep telling myself". [S:confused:

Later:cool:
 
steering

going to use two borgenson steering u-joints and an 11' shaft to clear the header.

l don't think it will need a lolipop joint because is such a short distance and very little angle on the shaft from the box to the column.

pics wil be posted when finished with the steering stuff :eek::

Later:cool:
 

Attachments

  • borgeson-needle-bearing-ujoint.jpg
    borgeson-needle-bearing-ujoint.jpg
    33.7 KB · Views: 5
  • b shaft.jpg
    b shaft.jpg
    19.1 KB · Views: 4
thoughts

l am sitting her thinking about how close, so yet far, from getiing her running.

june 13th will be 9 years since l lost him. Jimmy's birthday is june 25th and he would have been 25. l want so bad to have her done by then. its is frustrating but we all have things in our lives we have to deal with.

l hope to make the deadline, but it's looking like we may not.


l know l am ranting, thanks for puttiin' up with me :)

Later:cool:
 
Last edited:
wire holders and tach

got the tach in and made some redneck addel clamps:D

old license plates work great for wire loom holders and once the bed is in, no one will ever see'em:eek: gonna use'em under the truck along the frame also.

Later:cool:
 

Attachments

  • DSCI0213.jpg
    DSCI0213.jpg
    131.6 KB · Views: 62
  • DSCI0217.JPG
    DSCI0217.JPG
    131.8 KB · Views: 60
  • DSCI0216.JPG
    DSCI0216.JPG
    101.4 KB · Views: 59
  • DSCI0221.jpg
    DSCI0221.jpg
    93.3 KB · Views: 72
  • DSCI0223.jpg
    DSCI0223.jpg
    86 KB · Views: 65
Can you see your speedo past the steering wheel?

I had trouble fitting everything in where I could see it, ended up having to cut the speedo in straight above the column.
 
exhaust

DONE:D

exhaust is done, now on to front-end sheet metal and raditor stuff.

Later:cool:
 

Attachments

  • DSCI0228.jpg
    DSCI0228.jpg
    100.6 KB · Views: 41
  • DSCI0230.jpg
    DSCI0230.jpg
    97.9 KB · Views: 37
  • DSCI0224.jpg
    DSCI0224.jpg
    208.7 KB · Views: 40
  • DSCI0226.jpg
    DSCI0226.jpg
    168.1 KB · Views: 41
  • DSCI0235.jpg
    DSCI0235.jpg
    109.5 KB · Views: 41
  • DSCI0234.jpg
    DSCI0234.jpg
    120.5 KB · Views: 49
seeing

Can you see your speedo past the steering wheel?

I had trouble fitting everything in where I could see it, ended up having to cut the speedo in straight above the column.

not sure yet, that is why l set it off to one side, that way l think l can see it:confused:

l will know soon, just got the steering shaft made and in the next couple days the colulmn and wheel go in,

Later:cool:
 
not sure yet, that is why l set it off to one side, that way l think l can see it:confused:

l will know soon, just got the steering shaft made and in the next couple days the colulmn and wheel go in,

Later:cool:

It's tricky, hey.

This was the only way I could get anything into that hole while it still remained visible.
The top left gauge you can see from outside the wheel and the bottom right one you can see through the centre of the wheel. Obviously it would be the other way for LHD.

IMG_0249.jpg


IMG_0248.jpg


I only ever sat in mine a couple of times while it had the standard column and front end in it so I can't remember, but visibility of the speedo must have been pretty terrible even when the trucks are dead stock?
 

Latest posts

Back
Top