This is what I have so far..

Rat Rods Rule

Help Support Rat Rods Rule:

This site may earn a commission from merchant affiliate links, including eBay, Amazon, and others.

rustylocke

Well-known member
Joined
Jun 8, 2010
Messages
134
Location
Dublin, TX
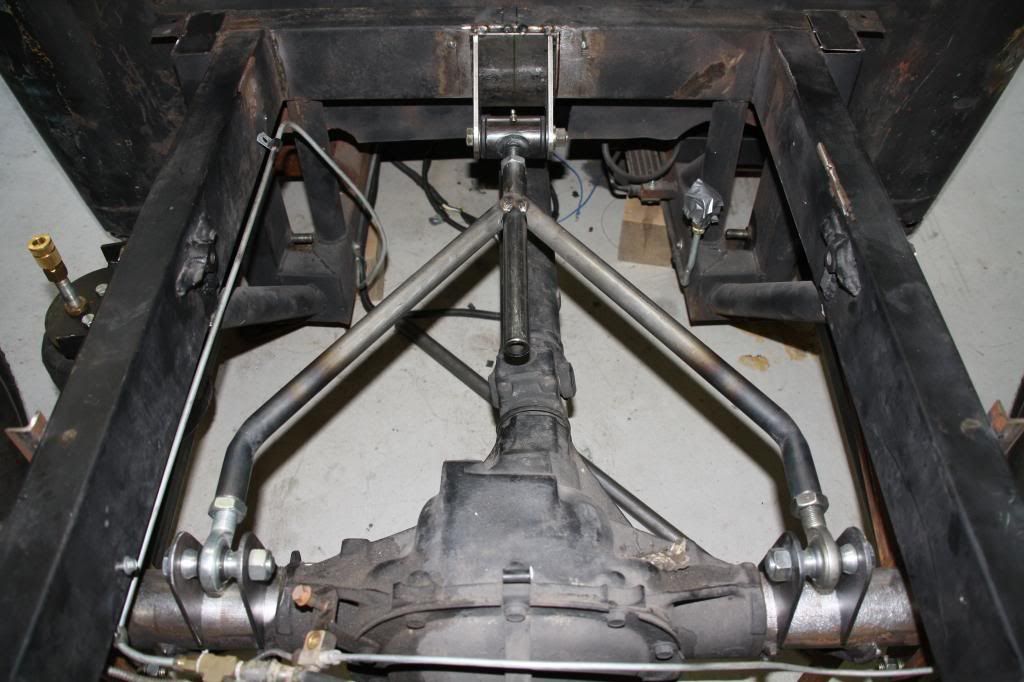
This is what I have got so far and most is just tacked into place. Before I go any farther I am ready for you guys to pick it apart. Keep in mind the bags are just sitting on the bars for now. I have not got around to the brackets yet. Let's just focus on this upper and lower bars for now. Thanks for the help, and be gentle.
IMG_2472_zps83b4165a.jpg

IMG_2469_zpse8502fb3.jpg

IMG_2470_zpsf60c1461.jpg
 
If what I think I am seeing is right this is a 3 link two lower links and the single mount point on the upper link correct?

Suggestion: you need a panhard bar or watts link to locate the axle left/right.
I think with how the 3rd link is mounted so far from center with the heims you may put the hurt on the center mount, but I'll let others speak up on that too.
 
You are right and I am using a panhard bar. It is laying on the floor under the driveshaft. I haven't made the brackets for it yet.
 
I use this wishbone style on all my cars instead of a panhard bar.
247-2024.jpg

Do not use a wishbone style together with a panhard bar. When the suspension goes through bump and rebound, the bars pivot in two different directions.
With this style of upper bar being a wishbone, there,s no need for a panhard bar however, the front pivot has to be a heim so it can rotate when the rearend articulates through it's travel.
The image is a slip style wishbone for four link rears but, the non slip style (like you have) is just fine to use as the third link in a three link suspension.
You do need a cross bar between the angled bars for bracing. It welds to all three bars creating a truss.
You can see this on Jeg's website
http://www.jegs.com/i/Competition+Engineering/247/2024/10002/-1
 
From Jegs: "Competition Engineering Wishbone Axle Housing Locators eliminate sway in 4-Link and Ladder Bar suspension systems. They positively locate the rear axle housing for super straight launches without binding."

I assume this means this is for adding to a 4-link setup, not a replacement for the upper links...

What I was getting at is that during cornering or suspension travel on one side, because the upper links are mounted so far out, the twist on the center bushing mounted to the frame would be more than if it were like a more traditional 3 link setup that is mounted close to the center of the pig.

I know there are more people on here that have ideas about this setup... speak up =)

66744.jpg
Please bare with me here for a moment. I don't want to come off as a know it all but, I do know my suspensions.
When the upper link is welded solid to the wishbone it then creates the third link to the suspension and since you have a triangle and two connections to the rear it creates it's own track locater.
The only modification to what rustylocke has is, it needs the heim on the end that mounts to the frame so the axle can articulate without binding.
Yes, the wishbone I used for comparison from Jeg's says 4 link and ladder bar, that is because the bar connecting the wishbone to the frame has a slip tube. Welding this slip tube solid creates a three link upper.
Here's a three link for example off the H.A.M.B
You can run these either direction ie: two connections to the frame or two connections to the rearend.
attachment.php


Here's another from Offroad fab
12333820002.jpg
 
I didn't say it would not work, but I did say that center mounted bushing would be in for a real hurt with that setup.

To each their own, I don't consider the offroad fab setup as one I would run on the street but that is just me. The first picture you posted has a better shot at properly locating the rear end under lateral loads during cornering in my opinion.
 
Well work has slowed so I thought I would take a week off and work on the old turd. I've been busy. Nothing on the truck is a bolt on and I must say that it fought me every step of the way but I think it turned pretty good. This is not a conventional install so just bare with me.
Here is the part that took the most time. The lower bag mounts. I worked late into the night and I must say my brain was not working. For some reason I insisted on a bolt-on for the lowers. Why I don't know but it works.

IMG_2528_zps309ec2e1.jpg
[/URL][/IMG]
IMG_2488_zps97931197.jpg
[/URL][/IMG]
IMG_2487_zpsae6969d5.jpg
[/URL][/IMG]
IMG_2485_zpsd4b0bb98.jpg
[/URL][/IMG]
 
Design is good :cool:
Where I circled in red you have to have a heim.
Where I circled in blue you can use either the heims or rubber mounted rod ends.

attachment.php
 

Attachments

  • IMG_2485_zpsd4b0bb98.jpg
    IMG_2485_zpsd4b0bb98.jpg
    75.3 KB · Views: 134
right in front of the blue circles you have created a dangerous breaking point by heating and bending the tubes.

you can see where the tubing is no longer round.

these narrowed areas will eventually break.

not trying to be harsh or critical, just seeing a danger to you and your loved ones.

peace, love, and happy motoring.
 
Design is good :cool:
Where I circled in red you have to have a heim.
Where I circled in blue you can use either the heims or rubber mounted rod ends.

attachment.php

I see that but I am curious how some big named shops use a setup like this all day long and get away with it.
S10_3-Link_Kit_1jpgthorbros_zps8bf5b454.jpg

Custom1WayAdjustableWishbonewithBushing_0_zpsdd806ede.jpg
 
right in front of the blue circles you have created a dangerous breaking point by heating and bending the tubes.

you can see where the tubing is no longer round.

these narrowed areas will eventually break.

not trying to be harsh or critical, just seeing a danger to you and your loved ones.

peace, love, and happy motoring.

Question, does it make a difference that this is 1" solid stock and not tubing? I can add a gusset if need be.
 
it will just take a little longer to break.

gussets or a re-design of the junctions is in order.

personally I would turn the top link around and have one spherical joint on top of the diff and 2 pivots at the front. this would give you a much better handling car, as it would not create bind on roll.
 
I see more problems than the design of that upper link. You are not getting full travel from the bags since they are not near to being collapsed with the axle touching the frame. How are the lower links attached to the rear end? If they are welded solid, it won't articulate - even if there are poly bushings on each end of the links, same problem - something has to swivel for it to work right. With 3 points on the upper link and 2 on the panhard bar, you would have been better off using two angled upper links from the start to make a proper triangulated 4 link, no Panhard needed. Make a mount to bolt to the rear diff cover so the upper links can mount in the center above the pumpkin and angle forward and out to the frame sides.
I hate having to re-design stuff myself and I don't want to rain on your parade, but I see a world of hurt with this design.
 
My thoughts was to just make it truck arm style suspension. You could loose the whole upper link and just use a pan hard.
 
I see more problems than the design of that upper link. You are not getting full travel from the bags since they are not near to being collapsed with the axle touching the frame. How are the lower links attached to the rear end? If they are welded solid, it won't articulate - even if there are poly bushings on each end of the links, same problem - something has to swivel for it to work right. With 3 points on the upper link and 2 on the panhard bar, you would have been better off using two angled upper links from the start to make a proper triangulated 4 link, no Panhard needed. Make a mount to bolt to the rear diff cover so the upper links can mount in the center above the pumpkin and angle forward and out to the frame sides.
I hate having to re-design stuff myself and I don't want to rain on your parade, but I see a world of hurt with this design.

I really do not know how to respond to this post. First of all how much lift do you actually need or can actually use. It lifts plenty for what I am doing. The lower link is a 2X2 with poly bushings on both ends with a tab welded to the axle just like most every other link setup. The 3-link bar was done that way because I don't have room to mount an angled tab. I used what I had and what I could afford. Granted it is not done yet, but tell me how this is any different than any other 3-link. Granted the panhard bar may not be necessary but what does it hurt?
 

Latest posts

Back
Top