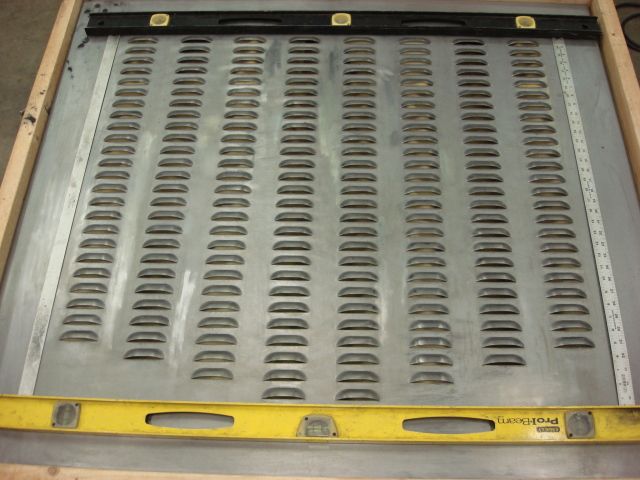
Roadster pickup from leftovers.

Rat Rods Rule

Help Support Rat Rods Rule:

This site may earn a commission from merchant affiliate links, including eBay, Amazon, and others.
Thanks Raven. We used to go boating and fishing on the Clermont chain of lakes, really beautiful up where you live. Where do you vacation down here ?

Oh, by the way, tonight I got the front panel done for the bed, now it has 4 sides ! [cl But I forgot my camera, so it will be tomorrow before I can post pictures. Next step is to figure out the way I will bolt or rivit the four sides into one big box, and how I am going to add reinforcement to it.

I'm really happy to get the part done where I have to use the nibbler to cut pieces of 18 gauge, the little C shaped pieces of steel that it kicks out are like Ninja weapons. I had to throw away one pair of work shoes because the whole bottom was covered with them. I spent an hour or so sweeping and vacuuming them up, and it looks like I got them all. Glad that part of the build is over.


We stay on estero blvd, a friend has a time share there. We go there early july almost every year
 
Thanks, David. Maybe, just maybe I will have it done, or at least drivable, by February for Billetproof. If you haven't been there yet, YOU HAVE TO GO. :D It is just the best event going, and all the cars are the kinds we guys like on here, no late models or bling.

Don
 
:eek: Oh my Don.......that thing is right on!
agreement0.gif
 
Thanks, David. Maybe, just maybe I will have it done, or at least drivable, by February for Billetproof. If you haven't been there yet, YOU HAVE TO GO. :D It is just the best event going, and all the cars are the kinds we guys like on here, no late models or bling.

Don

I would love to have mine done by then Don't see that happening :(. But soon enough. Where is billetproof going to be?
 
If they have it at the same place as last year and a few years previous to then, it will be at Don Garlit's museum in Ocala. You really should go, even as a spectator.........words can't describe how much fun it is.

Don
 
To keep moving along on the bed for my rpu I decided to make the stake pockets next. Last night Dan and I fooled around with some scrap pieces of 18 gauge to see how we could bend up the shape I need. I took dimensions off of the stake pockets on Dan's rpu because he has an original Model A bed (Brookville). The ones on his car are about 2 inches wide, not including the flanges, by about 1.5 inches tall.

We found we could make two of the bends in the brake, but the last two bends (for the end flanges) had to be hand shaped on a jig we built to go on the welding table. The problem was that once you bent up the C shape for the center, the piece would not fit back into the brake to bend those flanges. But all we did was take a mallet and shape those flanges over a buck we made and that solved that problem.

So tonight I cut out 4 pieces of 18 gauge that are 6.5 inches x 16 inches. Each one of those will become a corner pocket. I scribed lines on that piece and took two angled cuts out of it so that it will tuck up under the wing, which is also angled the same amount. Here is the first piece all cut and ready to bend up in the brake.

myrpumakingstakepockets002.jpg


myrpumakingstakepockets003.jpg


myrpumakingstakepockets006.jpg


Each pocket is going to be shaped like a top hat if you look at the profile. Both sides have a lip where 5 number 10 stainless button head screws will hold the pocket to the bedsides and the tailgate and front piece. Here is the first stake pocket Cleco'd in place. I left the bottom longer than needed because we are going to taper the pockets down at the very bottom to make it flow better into the bedsides.

myrpumakingstakepockets010.jpg


The last part will be to weld a cap on top of the pocket that will go up under the lip to steady the lip. I will either run rivets down through that cap and wing, or more ss button head screws. Not sure which yet as this whole thing is still in the figuring out stages. Now I only have 3 more pockets to make.


Don

--------------------------------------------------------------------------------
 
Last edited:
Thanks, DR. I agree, it needs them on the corners to dress it up and make it look like a real bed.

Today was one of those days I just couldn't get interested in doing anything major to my project, so I piddled around a little. I squared the bed up and scribed a line around the inside showing where the floor will lay. I bought some 1 inch angle iron and am going to run that around the perimeter so the floor can lay on it and be bolted down to it.

I removed the bed from the car and dragged out the louvered panel I will be using most likely for the floor, or possibly for the tonneau cover........haven't decided yet. Dan made this panel up to use on the first version of his own rpu, and he sent it off and had 204 louvers punched in it. I wasn't sure how it was going to fit my shorter and narrower bed, which is why I was anxious to check it out now that I have the final size of my bed.

Luckily, the louvered area is just inside the area I need to fit into my 40.5 wide x 35 long bed. It is almost like it was planned that way. It would be a shame not to be able to use it as it has been just sitting inside a sealed shipping crate for the past 5 years or so. I laid down some levels and yardsticks to difine the area I am going to use, just to get an idea of how it will look. Now I just have to drag out the nibbler and make 10,000 of those little C shaped pieces of steel again. I am still finding them in the bottom of my shoes and have to use needlenose pliers to get them out.

Here is the louvered panel with the levels and yardsticks marking the area I will be cutting out to use.

myrpulouveredcover002.jpg


myrpulouveredcover005.jpg


Don


This picture shows this tonneau cover on the first rpu Dan built, before he took a sawzall to it and started over.

dansbedlowered.jpg
 
Looks awesome as usual! [cl. Glad to see that expensive panel is getting put to use finally. What ever you decide to do with it, I don't think you can go wrong. [P
 
Looking really good Don, I really like the bead detail you rolled into the bedside, would have liked to do that on mine, but I had 16 gauge and my little cheesy roller doesn't like 16 gauge at all..oh, well
 

Latest posts

Back
Top