49 chevy truck booger

Rat Rods Rule

Help Support Rat Rods Rule:

This site may earn a commission from merchant affiliate links, including eBay, Amazon, and others.
haha it will all be clear shortly!

I didnt get back on the jig, I ate dinner and got a ding from my email. I have been looking for a replacement bed for my 46 (it came with a 47 bed a couple pages ago). 46 for parts. KC number, but pictures showed a bed.
Screen%20Shot%202016-04-26%20at%209.52.08%20PM_zpsh1uincqg.png

IMG_2680_zpsohbfnlzj.jpg

IMG_2688_zpss9hvwokh.jpg


then he says its a GMC tailgate!

IMG_2684_zps5nnflxcb.jpg

Not sure if you realized, but that looks to be a 37-38 bed and fenders. The circle around the GM logo, and the bodylines and shape of the fenders, etc. tipped me off. If you can make use of it, all the power to you. Just thought you might want to know.

I'm jealous of the jackpot you stumbled upon! And that phone company box is seriously cool!
 
snopro I noticed it was probably the earlier bed, but the fenders are only slightly different than the 39-46 and they look a lot better than 47-55 fenders. the short chevy bed matches the color of my truck so I will likely use that bed with these fenders.

peabody I didnt get to ask about the train horns on the roof, but other things I did notice was that the truck has 17x5.5 artillery wheels and a 1936 chevy banjo steering wheel. the steering wheel has lost most of its rim but is in good shape otherwise. there is also an old AM radio under the dash.

that utility bed has made my fingers bleed, trying to google and find info on it. its a mccabe powers utility conversion, I cant wait to find a 48-49 cab and make a cool hot rod out of it.

I've seen a few hot rod trucks made with power company beds (various years), they're super cool.
 
I stopped by to pay my balance yesterday and he was at the pasture cleaning out the beds I bought. we took advantage of the sunny day and moved the truck from the upper pasture to the lower pasture, in line with the street entrance so the flatbed could pick it up. I stood on the running board and steered while he pulled with the tractor, rolled easy and the trans and motor were not stuck, thats a new one on me, almost everything I have bought in the last couple years was boat anchor seized up.

IMG_2763_zpsbhgpfbha.jpg


took a couple more snaps of the utility bed, noticed the gas can yesterday!

IMG_2785_zps70e9yjix.jpg

IMG_2783_zpssret4rzg.jpg


this is the 47-55 bed I bought, very clean
IMG_2788_zpsovjrpbx0.jpg


shop called! seat is done!
seat3_zpscm2eotji.jpg

seat2_zpssqjgeue7.jpg

seat1_zpsr1p9y3qu.jpg


looks great in the sun, really the color I was looking for in the first place I think. the back is carpet, and I will get 2yds of the same for the floor. they said no problem to stitch the edges once I cut it to shape.

IMG_2795_zpsed3eyinj.jpg
 
Last edited:
back on the jig, measuring the height of the first part
IMG_2805_zpsaybiyejk.jpg


its a rather crooked attachment, but some 50% cuts in the strap and lining it up on the jig made it perfect. Alternatively I could have made this from several pieces, next time I think I might.
IMG_2806_zpsikm8jbu0.jpg

IMG_2807_zpssucakcfl.jpg


my daughter is addicted to watercolor, so I have a few books with nice stiff covers for pattern making. 12 pack pop or barley pop boxes work great but I rarely drink either.
This is the importance of the jig, it gives reference to what direction to make the cuts, and especially how long it needs to be.
IMG_2808_zpszqqaife5.jpg


first use of the welding table, I like it, and I missed using the plasma, with a standoff it makes great cuts and doesnt burn up my t shirts like the grinder.

IMG_2809_zpsq3tqmwbd.jpg


baby went to bed, I was getting in a groove. her bedroom is above the back corner of the garage, so no grinding or air compressor past 9:30
 
thanks!

I am absolutely floored, when we moved the 1941 truck down to the lower yard, we didnt have the chains long enough and dented up the headlights. I called today, he had another one in the ad and it had good headlights so I wanted to see if I could buy the headlights from it. he said and I quote "well I told you on the phone that I was throwing that cab in. "

:uhoh:

good googlly moogly. I have two mostly complete 41s now because I bought the extra bed. Have to figure out how to get all this steel home! the only picture I have of the extra cab

IMG_2741_zpsxkbsdl6i.jpg


brenden was home this weekend so I picked up the brake lines I needed. he was busy with the back bumper so I pulled the lines MY way, disconnect at each caliper, at the rear union, and unbolt the master. ONE PIECE. it will go in that easy too. found a nice shop chair on the side of the highway too. momma didnt cook the breakfast with no hog but it was still a good day.
IMG_2835_zpsfffxhsv0.jpg


anyway. back on the pedals today. using the jig dims, cut the top piece
IMG_2836_zpslsjrvfp7.jpg


and the back piece
IMG_2837_zpsswbahdqu.jpg


I had a piece of 1/2x1/2 tubing kyle gave me and was using for a standoff for the plasma, it was a real bitch to hold and use, so I welded a bigger tube to it. perf.
IMG_2838_zpshjx0m2zp.jpg


using the jig to set the angle of the top to the back
IMG_2839_zps0e4wfl4l.jpg


drilled and bolted the pedal assembly in to check some measurements
IMG_2840_zps0tkxucq9.jpg


pedal lines up right
IMG_2842_zpsdqd008pt.jpg


same distance I say good!
IMG_2843_zpsy6ipqnu4.jpg

IMG_2844_zpsmqz5z8uw.jpg
 
want to grab that 45 degree bolt, patterned cut and installed
IMG_2845_zpsy7akvqe6.jpg

IMG_2846_zpsaez5br5y.jpg

IMG_2847_zpsev2wvxdj.jpg


second gusset doesnt need to be a full one
IMG_2848_zpsnmmqmica.jpg


flange that will bolt to the firewall
IMG_2849_zps78a4b5ie.jpg


gussets for the opposite side
IMG_2850_zpse4zmeneg.jpg


tried out my circle guides. used a standoff since I have the fine cut tips in. work like a treat
IMG_2851_zpspx28e0h9.jpg


braced the top since it will be the area with the highest pushing load.
IMG_2852_zpsyojiwr5r.jpg


where I stopped today, need to figure out what to trim on the right, how to mount it on the left, and cut/drill all the holes and it will get installed tomorrow.

IMG_2853_zpszfas8gbu.jpg


more to come!
 
I guess a couple shots of where I am at wouldnt hurt. dont mind the goobery hole on that 45, I will be welding in a stud for it.

IMG_2854_zps9zsuhwy7.jpg

IMG_2855_zpsy9nzqfyk.jpg
 
good idea using all the electronic related parts from donor. makes for a lot more work. but makes for better finished project. hey I may have a set of those gauges . I'll look.
 
I dont know, it seems like 6 of one half dozen of the other to me, I like taking a known running/driving donor and relocating all the necessary parts. If you think about it, the wiring harness doesnt know what truck its in, it just knows the fuel pump is hooked up, the turn signal switch is hooked up, the steering column is installed, etc. Thanks for looking for the gauges!

I think next time I will approach this differently, get rid of the aluminum pedal box and just reuse the pedal. Make another jig that locates the pedal and the column mounts. might be cleaner and definitely lighter. Thats development though, its the part I LOVE.

cut the booster holes today, used my circle guides and I dont know how I got along without them. the last screw hole gave me problems though...

IMG_2859_zpsch5vuvfy.jpg


oh. that might explain it. haha HUBRIS!

IMG_2858_zpsp5nd89tp.jpg


fits!
IMG_2860_zpsmvhoopax.jpg


I trimmed about an inch off the left (drivers side) of the pedal box and trimmed the entire support off the right. It was all ancillary structure for the knee bolster (crash protection) so it was easy to delete. the result was an almost perfect fit right out of the gate.

IMG_2861_zps51fta6k0.jpg

IMG_2862_zpsbbeqxosp.jpg

IMG_2864_zpssyd1bm7j.jpg


it centers the steering column between the gauges, and I can go up almost an inch when I trim the pedal box for the 49 column brace.

I need a son, or a willing daughter. this thing is unwieldy and jamming it up in the dash is a workout haha. I took the pictures with my tongue held just right. but closing in on it!

IMG_2865_zpsvboxorzk.jpg
 
at first i wondered why go to so much trouble to hang a pedal and steering column, but I understood why you were doing this. using your logic about the electric and I agree with that, the MC doesn't care what's pushing it and the column doesn't care whats holding it.
 
exactamundo!


Welded up all the joints, thought about cutting the mounting holes in it but it was pretty hot for a long time after this.
IMG_2873_zpsvrfemu4j.jpg


so I pushed the frame in and started hooking stuff up.
IMG_2874_zpsuk5r6l6i.jpg


had to weld up that motor mount I straightened out
IMG_2875_zpsg61ubrh1.jpg


my 20 year old cat wanted to say hi
IMG_2878_zpsj6xa6hrp.jpg


PLOP. new trans mount and both motor mounts you could whistle through. glad I fixed that one, thanks Mark!
IMG_2879_zpskpr3hhlh.jpg

IMG_2880_zpsdvaugwsk.jpg


time to fix the fuel lines, I kinked them at the plastic joint and didnt trust them
IMG_2881_zpsexzfajrr.jpg


no good deed goes unpunished, the bracket screw broke off, had to drill and tap
IMG_2882_zpsigadu51m.jpg


shortened the exhaust, worked out perfect, the trans mount hangers are in the right spot and now so is the gas tank crossmember and tailpipe hangers.
IMG_2883_zpslrklvkk0.jpg


all brake lines ran, fuel lines ran, I couldnt find the tank mounts in my parts pile, might have to pick a couple up this week along with a longbed aluminum driveshaft to be shortened
IMG_2885_zps7o496ern.jpg


I worked a little more past this picture, everything is connected and ready for the cab to be installed. probably tomorrow night!
 
went out to put the cab on and that supply line was bugging me, it had a flash rust showing on the inside edge, so I pulled it back off and cleaned it. easiest to do with the cab off. when I was finishing that, the new distributor showed up.

IMG_2925_zpsdisn2j3i.jpg


I ordered a new one, this donor gave up a lot of ancillary parts as it sat around to be installed, temp senders, oil pressure senders, fuel pump, serp belt, and the distributor. so new parts have been showing up. The oil pump shaft was a little out of line, I dont have a super long screwdriver though. I used a support rod to turn it haha, never throw anything away, right?

IMG_2926_zpsihcxa1kw.jpg

IMG_2928_zpsm8kuywuq.jpg


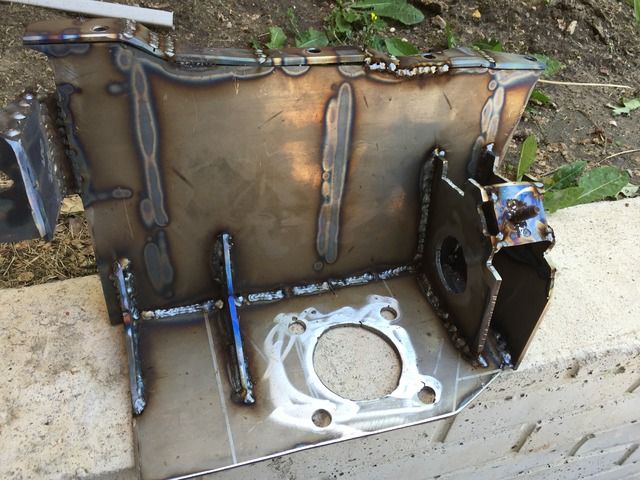
after some swearing at my $50 cherry picker, mostly because the wheels like doing whatever they want, and after a trip to the hardware store for some 5" bolts for the front mounts, I got the cab on. remember that the rear mount was 1/4" low, and I welded it up higher without trial fitting. shouldnt have worried, cab is level now. the only thing I can figure is the floor is slightly crooked because of all the rust and years.

IMG_2931_zps2nhsr0zh.jpg


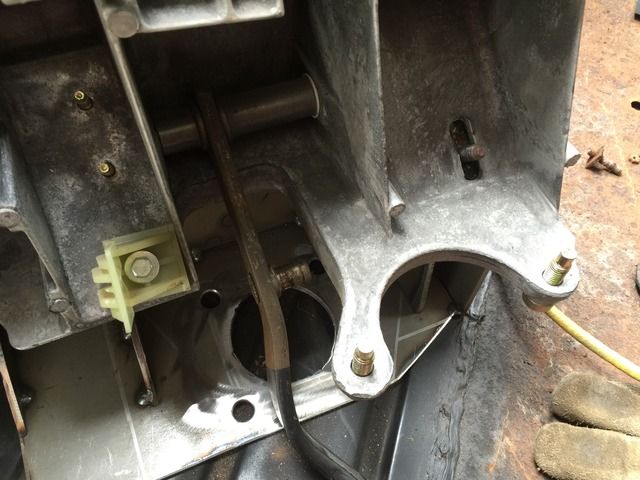
then the moment of truth, I had thumbnailed the front core mounts into a new position based on how much the rubber "squished", also the second mount was way out of shape. would the bolts fit?

shouldnt have worried, bolts dropped right through and fit PERFECT.

IMG_2932_zpsdihr4jju.jpg


hood shut perfect
IMG_2934_zpsdjatj1dj.jpg


wheel is turned slightly
IMG_2936_zpsnw7cpnui.jpg


tomorrow is brakes and steering! today I was limited to only a couple hours shop time (including inside out cleaning), tomorrow I have some stuff to ship in the morning but a whole day to work.
 
oh and I finally got some actual 41-46 rear fenders. my brother in PA texted me all excited, there was a 46 for parts on the local craigslist. I was the first to call! got a pretty good deal too, thanks bro!

IMG_0512_zpsr4dwafli.jpg

IMG_0509_zpsnqajwcco.jpg
 
started today fixing a little rust sticktion. the passenger door never shut all the way, a little PB blaster though and


that worked amazing, so I tried the cowl vent next, which was stuck so hard a breaker bar wouldnt even budge it. squirt squirt though and
IMG_2945_zpswmxnnsz1.jpg


I was going to call it a day after that, no sense tempting fate, I had worked all morning till almost 1 shipping a motorcycle engine and some other parts (invest in cardboard stocks, thats stuff is crazy priced now a days) and my brother was coming for dinner, but I figured I could at least try mounting the pedal and column. I scraped all the insulation off the firewall and got the holes cut, and bolted the booster to hold it
IMG_2947_zpsnpyzag31.jpg

IMG_2948_zps6n7mojyk.jpg

IMG_2949_zpsfyl8exbz.jpg

IMG_2950_zpszlwblxqk.jpg


after some trimming the pedals fit right up
IMG_2954_zps6vuuubos.jpg

IMG_2952_zpss3xydxtk.jpg


and the column dropped right in
IMG_2955_zpsolrft2sz.jpg

IMG_2956_zpsjz30bc9j.jpg


I need to triangulate to the dash mount and add the L bracket on the lower vertical bolt, it is not yet as sturdy as it can be, but I am tickled pink. the cowl vent still works, but the side vent will not, the pedal assembly is blocking it. cest la vie!

should run this week!
 
not much to report yet, I got my new gas tank straps in but no hardware or pump, so I messed with my recent purchases instead. beeps and I took the hour drive south and picked up two beds, the 46 bed and the 47, I know its a 47 because it has a gas tank hole in it!
IMG_2960_zpspsnb8wqy.jpg

IMG_2962_zpsx10y2pap.jpg


I started to muscle the beds around and the guy just laughed, pulled out the bale spikes on his loader.
IMG_2964_zpslnbt3mnc.jpg


the 46 almost fit inside the 47
IMG_2988_zpskyrpborn.jpg


visited my 41s, he pulled them across the creek for the tow guys, just need them to bring em home now.
IMG_2972_zpsgmtphmex.jpg


this is the extra one I didnt know I got
IMG_2965_zps3pzn2pn0.jpg

IMG_2966_zpseyhu3m4b.jpg


I have beed rebuilding the shed in the back yard and was about to build a wooden door, bought this instead while I was there.
IMG_2986_zpsjrtbcjzv.jpg


have to unload so I can go back tomorrow and get the phone company bed, but I dont have a loader. so I lightened the load a little by cutting out the steel floor
IMG_3007_zpsgzsub0qg.jpg


tried to do the same to the 47, but all the bolts are hard to get to, so I shimmied it off the flatbed and left it till help comes home.
IMG_3008_zps9ioswyty.jpg
 
Soooooo this is where all these trucks are going.....[ddd:D

Like what you're doing here Joedoh.....and about that door
you don't want to use that.......let me come take that off
your hands and get it out of the way.....
 
I waited till my wife and teen daughter were home and did it myself. pretty heavy!
IMG_3009_zpso2w9pyoj.jpg


did more heavy work today, miserable 2.5 hours loading the phone company utility bed. when we were loading the beds yesterday I asked about this trailer, what hitch ball size it was. he said it was a clevis pin, used as a feed trailer. ok, so I asked if his loader could lift it up on the flatbed, he said for certain it could. I went down today, chained up the trailer and lifted it 2 feet. it was too heavy. so I took the ramps off and used a boat winch that is rigged on the flatbed to pull it up the ramps while he pushed it with the loader. then the big strap my wife got at a garage sale had a smaller size ratchet. UGH. I used 6 straps and 3 boards I had cut to block the wheels and tongue.

IMG_3021.JPG-4_zps3i8zva17.jpeg


when I had it all strapped down he says "oh look it is a ball hitch". and the ball on the truck fit. :confused: with enough air I could have towed it home. now I have to get it OFF, no loader here but I have a ditch that I have been able to drive into and load stuff off before.
 

Latest posts

Back
Top