International L122 B Binder Rat Build

Rat Rods Rule

Help Support Rat Rods Rule:

This site may earn a commission from merchant affiliate links, including eBay, Amazon, and others.
you can always slosh the tank to make sure it doest leak down the road
Not really interested in coating the tank. I'd be worried about it in 5 years.

its always cool to see how different people tackle similar parts.. curious to see how your shifter linkage comes out

you going to have positive locks for the gears?

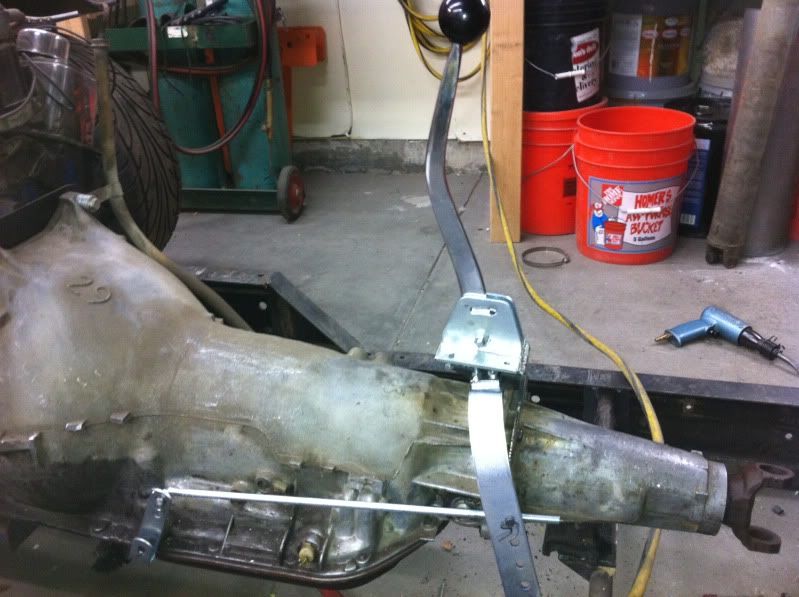
Well, I cheated. I found an el cheapo shifter at the local auto parts place. It's simple but effective. I used the bracket cause I wanted it mounted to the tranny, not the tunnel.
It has a positive lock for park, but nothing else [S
You push the lever down to get in out of park, then it slides between all gears relying on the trans detent to stop it. Not a very good design, but I'll file some notches at the drive location, one more shallow one in 2 and leave 1 alone. That way I can push up to 2nd from 1st, then to drive where it'll have a positive lock.
Photos of my Cop out to come :D


cop-out also cop·out (kpout)
n. Slang
1. A failure to fulfill a commitment or responsibility or to face a difficulty squarely.
2. A person who fails to fulfill a commitment or responsibility.
3. An excuse for inaction or evasion.


Yep, I'd say that sums the shifter up :D
 
Last edited:
Here's the shifter installed.
photo-75.jpg


I had to modify the bracket a bit but it will work nicely.
As you can see, there is only 1 notch for Park. I will be filing more in tonight for positive lock in drive gears.
photo-74.jpg


photo-73.jpg


I will be cutting off the extra length of linkage and cleaning the whole thing up a bit tonight too.
 
sure like that tailshaft bracket you built..that should make you a decent shifter, even if you did wuss out:D:D Shifter has been one of my eternal projects on my build, I keep it at work so I can dink with it when I have time..if I was paying myself $5 an hour, its probably a $1000 shifter by now:D:D Lokar now seems like a bargain..haha

Lookin good!!

It's solid and has a nice crisp feel which was what I was after. This shifter was like $50 and I would have easily doubled if not trippled that in cost if I was going hourly.
Then again, if I was adhering to an hourly rate on my build, it would go down In history as the world most expensive rat rod :D
 
I decided i should do a small sump st the bottom to catch whatever fuel remains when the tank is low. I wouldn't call it a reserve, cause its not very big but it will help scavenge the last few ounces before I COMPLETLY run out.

Just think of it as a small tank with 21 gallons of reserve...

Tank looks good.
 
I had that same shifter kit... but I decided not to use it and took it back.. good decision to put a drive stop in there..
 
Hahaha! I just looked at the pics (cause I'm lazy!:D) and was like 'Wow! He cut the shifter out, cad plated it and made it look like an off the shelf unit!'

Doh! Then I go back and read the print. [cl
 
Hahaha! I just looked at the pics (cause I'm lazy!:D) and was like 'Wow! He cut the shifter out, cad plated it and made it look like an off the shelf unit!'

Doh! Then I go back and read the print. [cl

Remember the post a little earlier where i said that im good at faking like i know what im doing? Well that's how :)
Usually i have a part made then i dirty it up and toss some ugly weld on to make it look like i did the work.
But don't tell anyone my secret. :D
 
Fuel tank placement advice?!

So I'm kinda stuck on where to put the fuel tank.
I REALLY want to add a filler neck on the side of the truck, for two reasons.
1) I can use a vented fuel cap in a filler neck mounted higher on the bed with no worries that it will ever leak, since fuel will never reach it.
2) I want to be able to fill up on fuel when the bed is full of stuff, if that ever happens.

I was originally going to go with a fuel cell style flush mount cap on the top of the tank, but I think I would need to add a vent line, and with it being so tight, I think the vent line might leak a little after fuel sloshes around after a drive.

I will be doing a bed floor of some sort, probably old wood, but I really don't want to have to have a access hole.

The problem is I don't have much room to add a filler neck. I have 2 1/2" of space to work with from the top of the frame to the bottom of the proposed bed floor. I can come straight out the side then up the inside of the bed to the filler neck in the bed.
I originally thought I'd only have 1 1/2" of clearance cause I wanted to keep space between the bed floor and the the top of the tank, but I can raise it up a bit.

If I have a vented cap, the tank can be COMPLETLY sealed at that point right?
If not, does anyone have a vent they have had luck with that was mounted right on the top of the tank and didn't leak on a full tank?

This photo shows where I'd like the fuel hose to attach to the tank and the clearances I have to work with.
photo-79.jpg


This one shows where the filler neck would attach to both the tank and the bed.
photo-80.jpg


The "x" closest to you in this photo is where the fuel pickup bung is going. It also shows the neck in each location.
photo-81.jpg


I think I might have answered my own questions typing this up, but I'd like to hear others thoughts.
 
Speedway and Smmit have rollover vent valves or sometimes they call them Tip Over vent valves. I have the one similar to the red on from Summit on the F2 Stang, it has worked out well.

On the '53 I coiled a peice of metal 5/16 fuel line about 3 times and attached it with rubber fuel line to a 1/4 NPT bung in the top of the tank. Seems to work.

On the '53 (Avatar) I did a side fill, like in your photo. I bolted on the filler and made a neoprene gasket - The gasket dissolved and the tank leaked when it was over half full. I recently pulled the tank welded in the filler - leaks fixed.
 

Attachments

  • ABT-TF350[1].jpg
    ABT-TF350[1].jpg
    7.4 KB · Views: 3
  • 458400_T.jpg
    458400_T.jpg
    2.5 KB · Views: 2
Speedway and Smmit have rollover vent valves or sometimes they call them Tip Over vent valves. I have the one similar to the red on from Summit on the F2 Stang, it has worked out well.

On the '53 I coiled a peice of metal 5/16 fuel line about 3 times and attached it with rubber fuel line to a 1/4 NPT bung in the top of the tank. Seems to work.

On the '53 (Avatar) I did a side fill, like in your photo. I bolted on the filler and made a neoprene gasket - The gasket dissolved and the tank leaked when it was over half full. I recently pulled the tank welded in the filler - leaks fixed.

Do you think it would be beneficial to do a roll over vent along with a vented gas cap or is that overkill?
I think i will weld in another bung in the top of the tank just in case in the future my plans change. I really don't want to spend the time cleaning the tank out well enough to weld on later.


I will likely weld in a filler neck into the side of the tank. I can get bolt in necks all day long, but theres no need to chance a leak if im already welding together.
I have learned that the use it Viton rubber is the only stuff you should ever use for fuel applications. I did some custom work on a fuel pump on my 03 cummins and have had viton under my pickup tube connection for 3 years and its still solid. Stuff aint cheap, but its worth avoiding the risk.
 
Well, I just thought of something else.
In reality, I NEED a tank mounted vent anyways. If I just have a vented cap, it will work fine under normal conditions, but not when actually filing the tank.

The liquid in the fill hose will be preventing the air from escaping and building pressure in the tank. If you've ever tried to fill a soda bottle in a sink on full blast, you know where I'm coming from. You don't get much liquid in as the liquid displaces the air, but the air doesn't have a way to escape.

The larger the filler hose, the less likely this condition will exist. If I use an 8" filler hose (not realistic) this condition would not exist at all. If I used a 1/2" hose, this condition would exist constantly.

If this is the case, I will have to lower the tank the height of the vent for floor clearances, giving me even less room for the filler hose. 1 1/2" hose will likely be my option.

Everyone agree?

There IS a way to combat having an actual valved vent at the top. That would be to run a small hose from a bung off the top to the tank, then terminate it in the filler neck right near the cap. This way when I have the fuel pump nozzle 6" down the throat of the filler hose, air will exit behind where the fuel contacts the hose effectively utilizing just the vented cap for all instances.
 
There IS a way to combat having an actual valved vent at the top. That would be to run a small hose from a bung off the top to the tank, then terminate it in the filler neck right near the cap. This way when I have the fuel pump nozzle 6" down the throat of the filler hose, air will exit behind where the fuel contacts the hose effectively utilizing just the vented cap for all instances.

This how it was done originally. Since you plan on having the filler cap high, do it that way. If you go with a seperate vent you'll still have to have a place on the tank for a vent line which means you'll still end up with two lines coming off the tank going "up". One large one for filling and one small one for venting. If you go with a vented cap and vent the tank at the the top of the filler neck, it'll be easier to make it look clean. Here's one from a 50's chevy P/U:
 

Attachments

  • $(KGrHqN,!jUE9IG(gYRHBPWlqITHug~~60_3.jpg
    $(KGrHqN,!jUE9IG(gYRHBPWlqITHug~~60_3.jpg
    32.5 KB · Views: 15
+2 on Klinks post. Just run a small hose up to the top of the filler neck from the top of the tank. this will vent it when filling. Then all you need is a vented cap and you are golden. Looking good by the way!
 

Latest posts

Back
Top